What is Ark?
It comes as an alternative for developers who are dissatisfied with mainstream solutions like Perforce and Git. Ark not only addresses the limitations of these solutions, but also strives to set a new standard of what a modern VCS should be, always prioritizing ease of use and high performance.
Getting Started
Ark has a client <-> server architecture, which means that you need to have a server running independently and then the clients will connect to it.
If you're working with a team, you'll want to setup a server in a dedicated machine that is always running, so that anybody can connect to it at any time. Then each client needs to setup their workspace on their machines and connect to the server.
If you're a solo developer, you'll most likely want to start by creating a workspace with a built-in server so that any time you run Ark it just handles the server for you.
Platforms
Ark is a single executable, which contains server, cli and gui. We currently support 3 platforms:
- Windows x64 (ark.exe)
- Linux x64 (ark with gui, ark-cli without gui)
- MacOS Universal (ark / Ark-Vcs.app)
Concepts
There's a few concepts that you should be familiar with when using Ark.
- Workspace: folder from which a user will work from;
- Project: self contained project (i.e. assets, branches, history), similar to depot in Perforce and repository in Git;
- Branch: parallel version of the project. Each project has at least 1 branch;
- Workspace Changelist: a set of local changes that can get eventually committed to the server;
- Changelist a set of changes that is already tracked by the server (may be committed or not). A changelist belongs to a branch;
- Shelved Changelist: a changelist that is stored in the server, but not yet committed to everybody else;
- Committed Changelist: a changelist that is marked as committed, which means it is now part of the history of the project and anybody getting latest on the branch it belongs to will get these changes;
- Shelving: send a workspace changelist to the server so it can be accessed by others;
- Committing: mark a changelist as part of the history of the project;
- Content Flag: represents what is inside a changelist (e.g. if it contains source code changes)
- Stable Flag: represents if a changelist is stable or not (what it means depends on your project, e.g. compiles, passes tests)
- Build Flag: represents the status of a build process (e.g. compile for windows) on a specific changelist
- Tag: a way to flag committed changelist in order for better tracking important commits;
- Locking: mechanism to control who can commit a file, in order to prevent data overwriting, specially useful for binary assets that cannot be merged;
- Branching: create a parallel version of the current branch, which has the root as a committed changelist;
- Merging: bring changes from a branch to another;
- Reverting: discard local changes in your workspace;
- Conflict: file has local and remote changes and a decision needs to be made about what version to keep;
Server
To start a server, you'll need to use the cli server command.
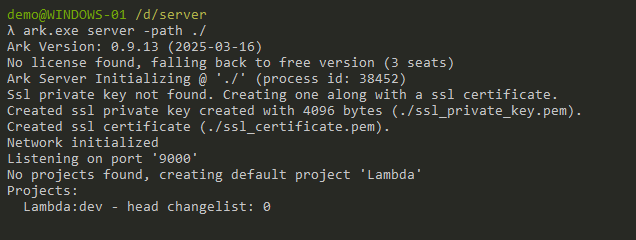
It requires the path to be explicitly passed if the server is being initialized in order to prevent errors by just running the server in an empty folder.
If the path is not passed, it will only run the server if it is already initialized in the current directory.
Valid log levels: debug, info, warning and error. Keep in mind that this only affects what is printed to console, the logs always use debug.
- -allow_dv_upgrade: If you're running a version of Ark that has a newer data version, which will upgrade it;
- -allow_non_empty_path: In case you have some extra files where you're trying to create the server;
When a server is created, it will by default generate a RSA key pair and certificate for SSL encryption with the clients, but keep in mind that you can always manually create your own and place them inside your server folder.
Settings
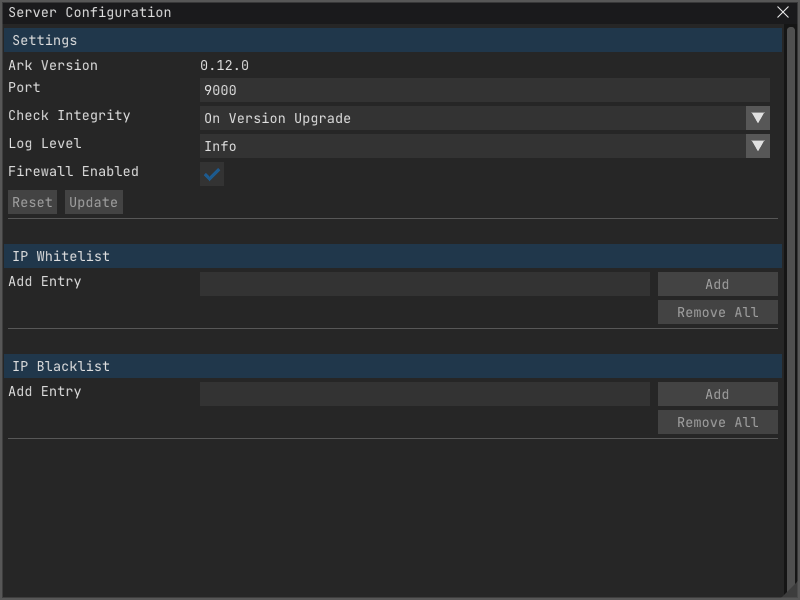
When connected to a server, you can access that server's settings via the Server -> Configuration menu.
It allows you to edit certain server settings directly from the client.
Hooks
Server hooks allow you to setup some rules that get triggered under certain conditions. These are usually meant to be used for build machine processes.
You can configure the hooks via Server -> Configuration menu:
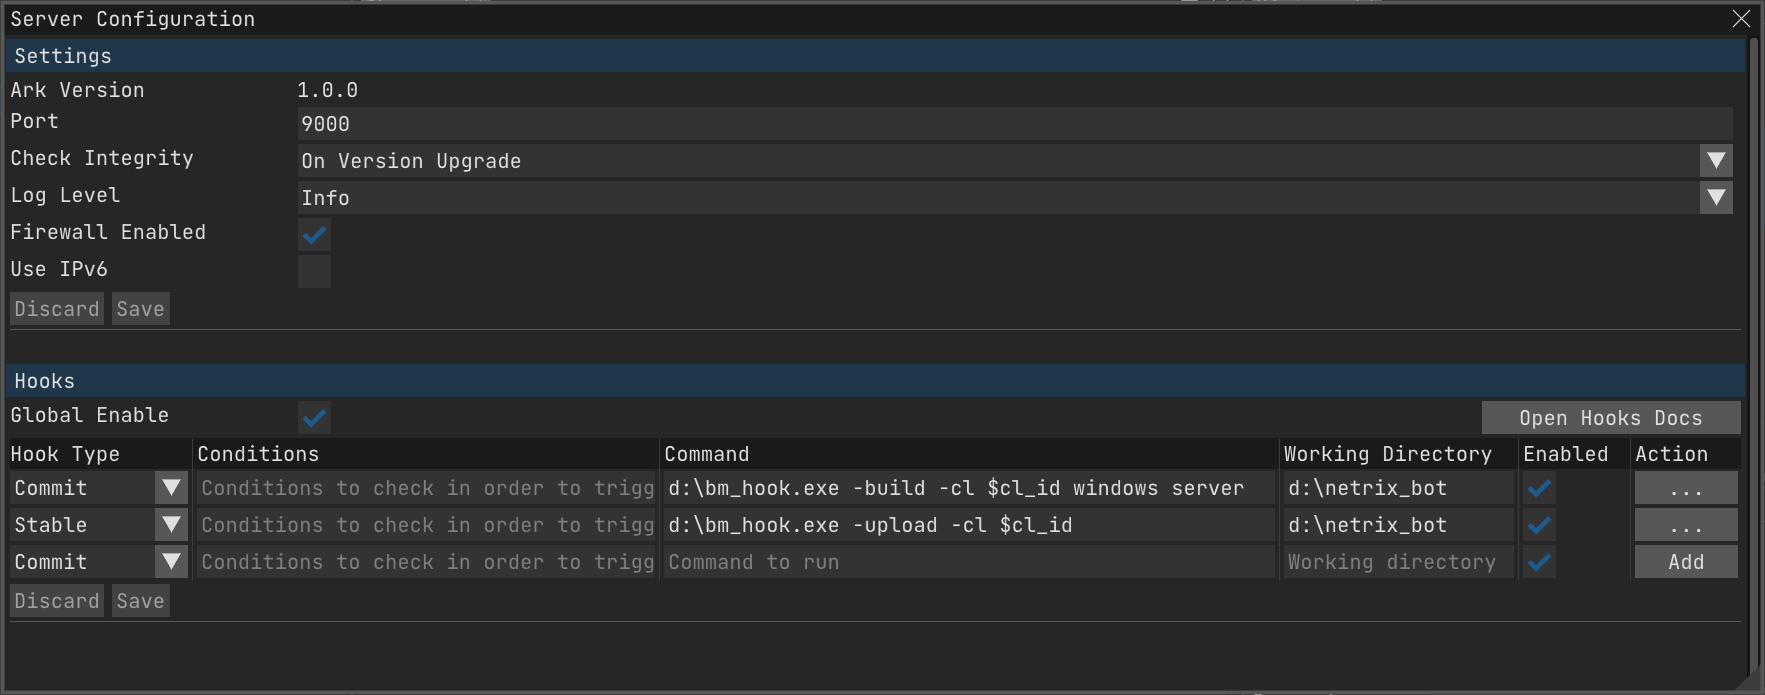
There are 4 hook types:
- Commit: trigger when a changelist is committed
- Build Flag: trigger when a changelist has changes to any build flag
- Stable: trigger when a changelist is marked as stable (both manually and via build flags)
- Any: trigger when any of the cases above happen
There is a Conditions field that allows you to define conditions that need to be valid in order for this hook to be executed. Conditions follow the pattern:
Supported functions are:
- any: valid if the variable matches any of the parameters
- all: valid if the variable matches all of the parameters (useful specifically for $command and $files variables)
- none: valid if the variable doesn't match any of the parameters
Variable names are prefixed with a $. Valid variables are:
- $trigger: useful for Any hook type, valid values are shelve, commit, build_flag, and stable
- $project: project name
- $branch: branch name
- $branch_full: branch full name in the following format <project name>:<branch name>
- $cl_id: changelist id
- $cl_revision: changelist revision (only valid in Shelve hook type)
- $user: username of the user that triggered the hook
- $email: email of the user that triggered the hook
- $time: commit time for committed changelists, shelve time for shelved changelists. Time is in iso format, e.g. 1969-07-20T20:17:39.000Z
- $comment: changelist comment
- $files: changelist file paths relative to the workspace
- $flag_name: build flag name (or icon name if it doesn't have a name, only valid for Build Flag hook type)
- $flag_state: none, running, ok or fail (only valid for Build Flag hook type)
- $set_manually: true if a changelist was manually marked as stable, false otherwise (only valid for Stable hook type)
Example:
If there are no conditions or all the conditions are valid, the Command will be executed from the defined Workding Directory (if not defined, it will use the directory where the ark executable is).
In the command, you can pass all the variables that can be used in the conditions. On top of all those variables, you can also pass a $payload variable which will be a path to a file with all the content pertinent to the hook triggered.
Example:
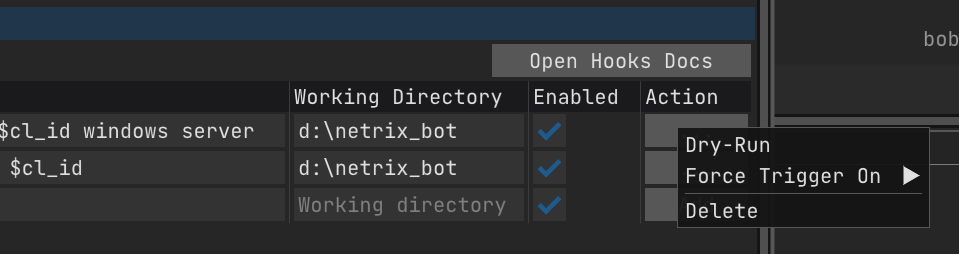
Because these things run remotely on the server, you can click the Action button and choose Dry-Run and it will process the command to show you an example of what it will run on the server.
You can also force trigger any of the hooks in one of the latest changelists.
Firewall
If you have a server with access to the internet, you'll constantly be prodded from random IPs. Even though we're confident about the security mechanisms put in place, it will just fill your server logs with trash.
So in order to improve this situation, you can have a server firewall working. It basically allows you to whitelist IPs that will always have access, and blacklist any that shouldn't.
If you have static IPs, you can simply whitelist them and then in the blacklist section add an entry *.*.*.* and every other IP will be discarded on connection except for your whitelisted IPs.
However, static IPs are not that common, so to help with this situation there's an automatic blacklist feature. It will blacklist any IP that will act in bad faith (e.g. sending invalid messages).
It will also blacklist IPs that fail login with password 5 times within a short time span.
You can manually edit the white/blacklist from the Server -> Firewall menu.
Integrity Check
Even though there are some checks during commit that validate that the data that the client was going to send is exactly what we were told, it is natural to be worried about the safety of your data.
On top of that, disks can fail, and having a version control system does not replace a backup system.
To mitigate these worries, Ark comes with a built-in tool to validate the integrity of the data stored. You can access it via Server -> Integrity Check menu.
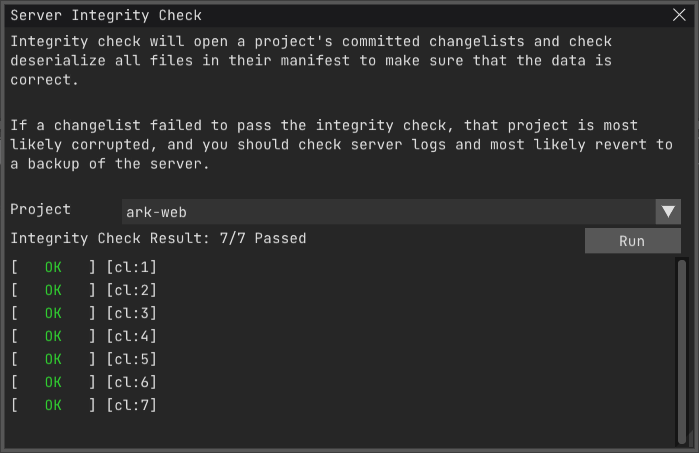
This panel allows any Admin user to trigger from the client an integrity check that will uncompress and checksum the data from all the committed changelists to verify that what we're expecting to have there is what we're actually able to load from the disk.
Depending on the size of your projects, this process can take some time. Besides being able to manually trigger it, it is also configured by default to run when the server upgrades to a newer Ark version. This behaviour can be changed in the server configuration panel, however it is encouraged to leave it on.
If any changelist fails this check, that project is most likely corrupted and you should restore a previous backup.
Client / Workspace
Each user that wants to connect needs to run a client. A client runs from a local folder called a workspace.
A workspace will connect to a server and map to a specific branch of a project.
You can change switch your workspace to another branch / project whenever you want, however it is advised to only follow this approach if you're low on available disk space or if the differences between them are minimal, since you'll have to override the files in the workspace.
Create Workspace
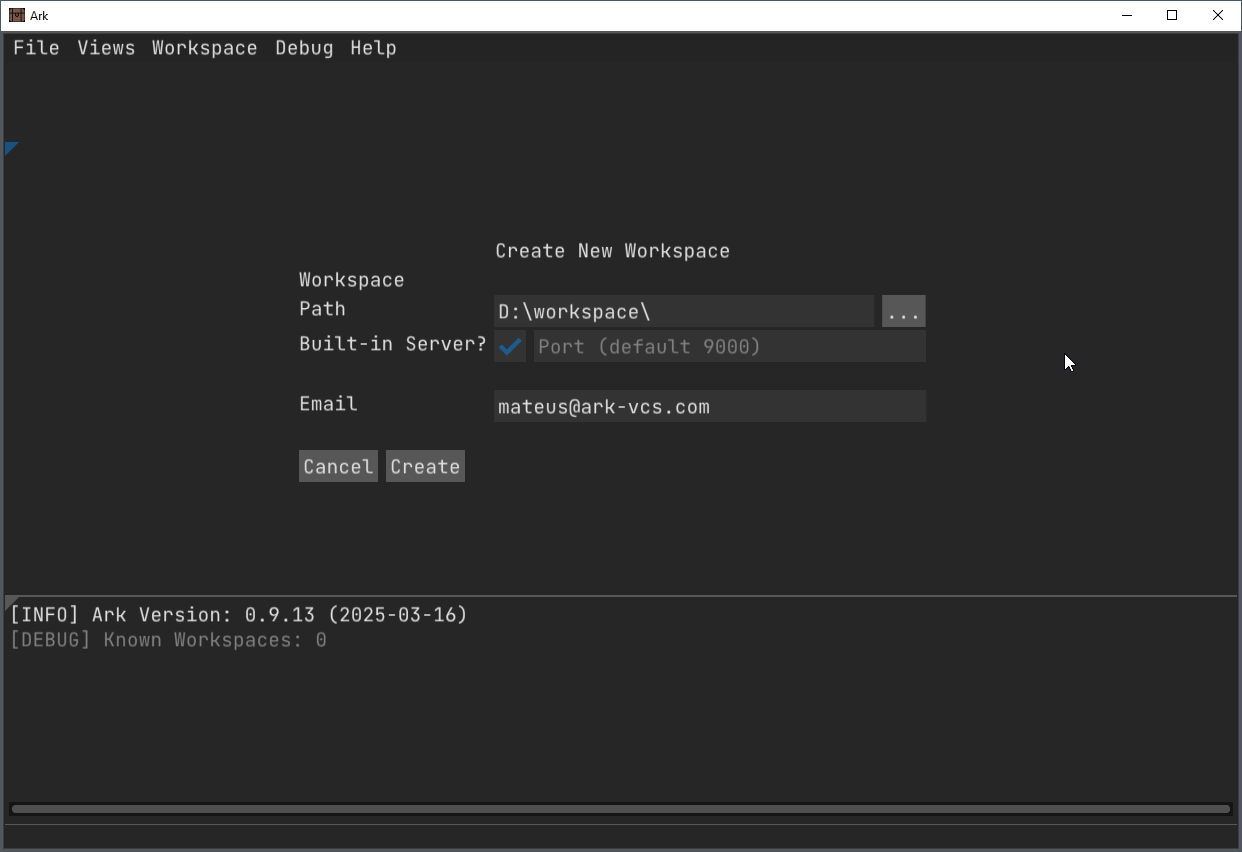
To create a workspace, run ark.exe by double clicking it.
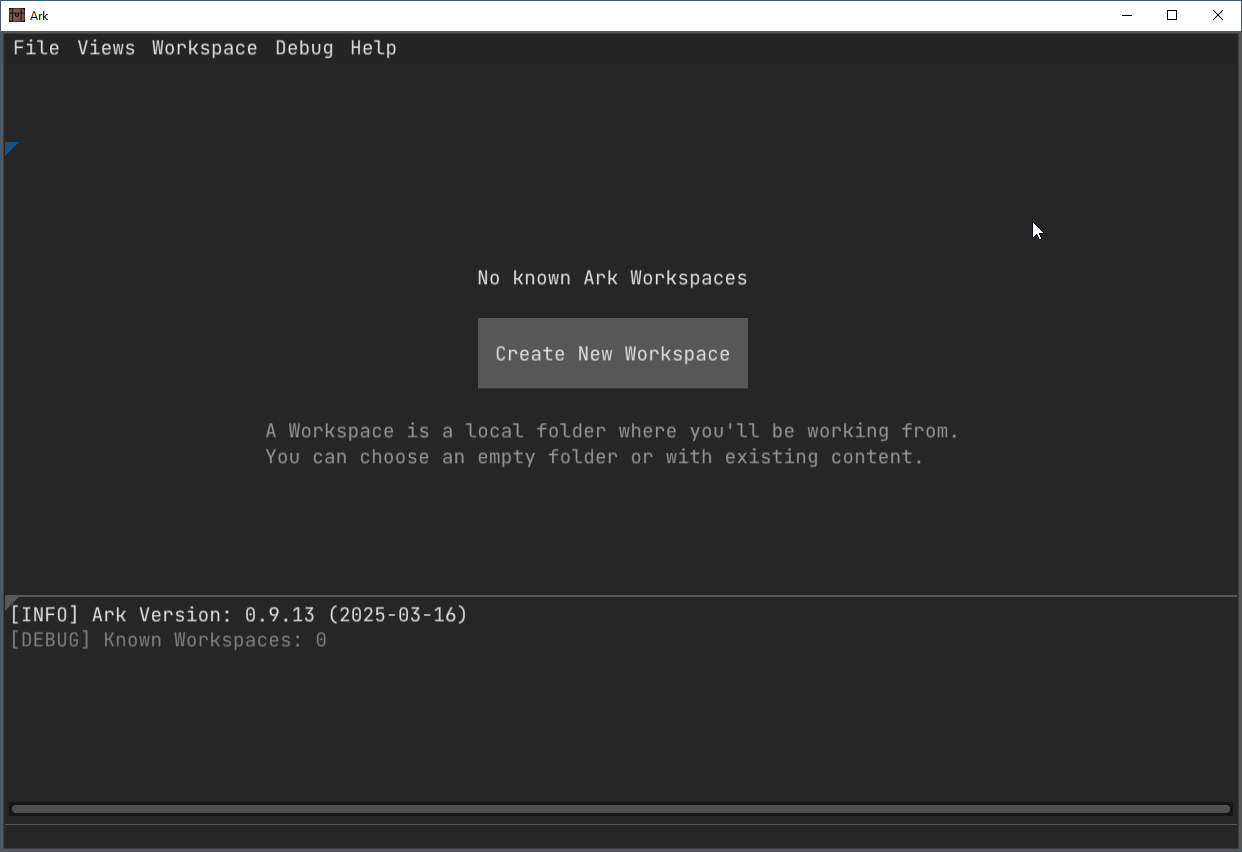
Upon launching, since you don't have any workspace, you'll be presented with an option to create a workspace.
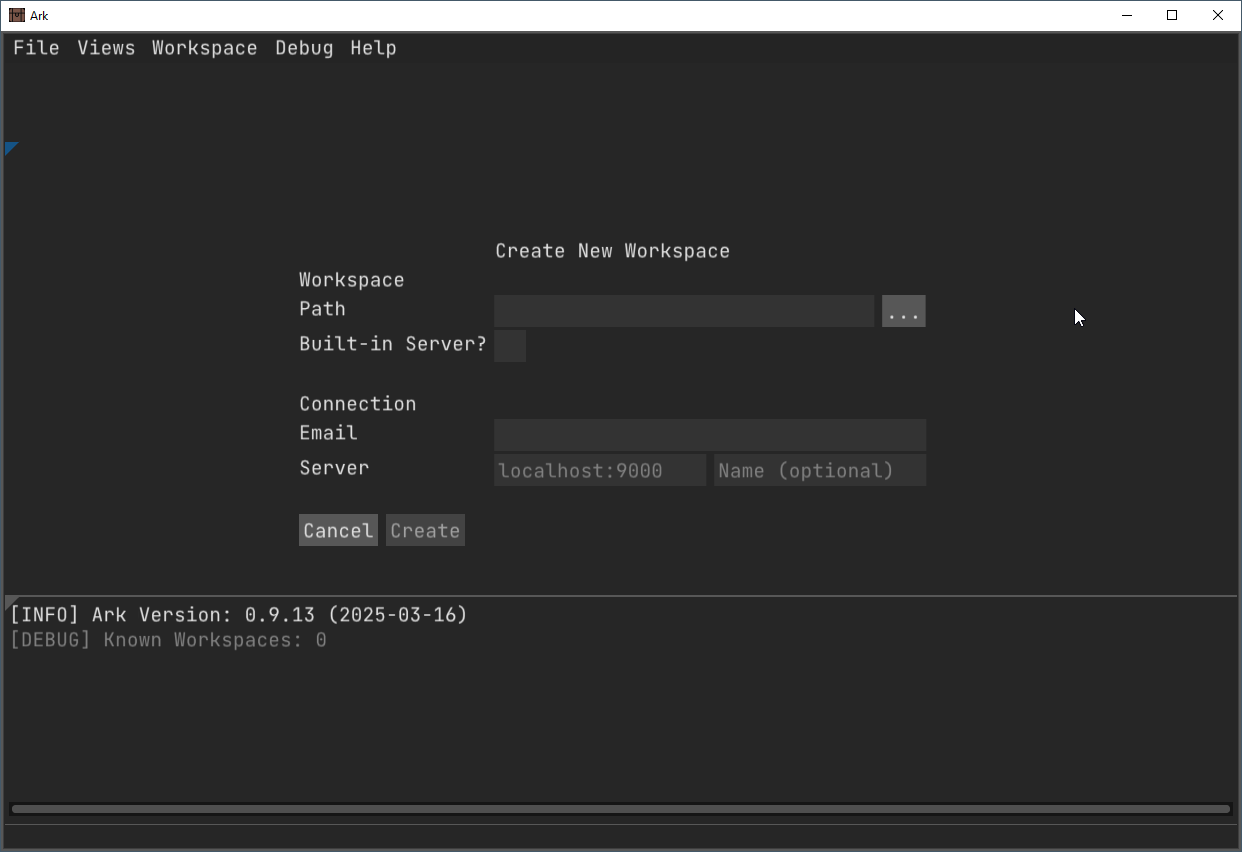
- Path: path to the folder you want to use for your workspace
- Built-In Server: If checked, it will create a built-in server (check xxxx for this use case)
- Email: This will be used for logging in to your server
- Server: Address of your server
- my-server:43000
- 192.168.1.100:5000
- [2001:0db8:85a3:0000:0000:8a2e:0370:7334]:7777
- localhost (since port is not defined, it assumes the default port 9000)
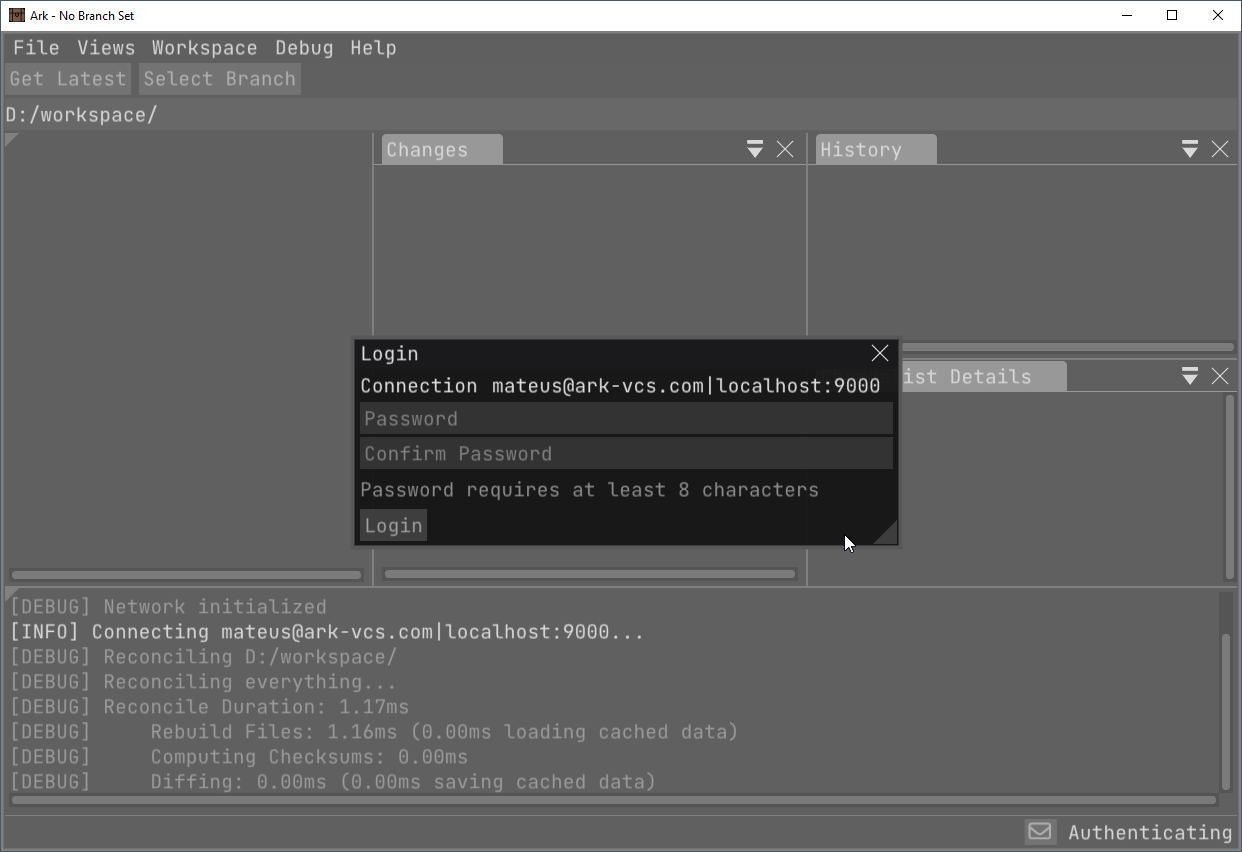
After creating a workspace, you'll now have a new layout with some panels. Ark will automatically try to login to the server, and since it is the first time you'll be asked to set a password.
When you create a workspace it will have .ark/ folder created. It is inside this folder that Ark will store everything related to this workspace.
To initialize a workspace via cli, you'll need to run the init command inside the folder you want to use.
If you already have a workspace initialized, you can run the same command if you want to switch email or host.
Built-In Server
If you want to run as a solo developer, when creating the workspace simply check the Built-In Server option. This only works with GUI.
Inside your workspace, a .ark_server/ folder will be created, from which the GUI will start / stop the server for you.
Git Import
If you have an existing Git repository you can import it to Ark, bringing in the commit history. To do so, you need to have the .git folder on the root of your workspace folder and go to Workspace -> Import From Git.
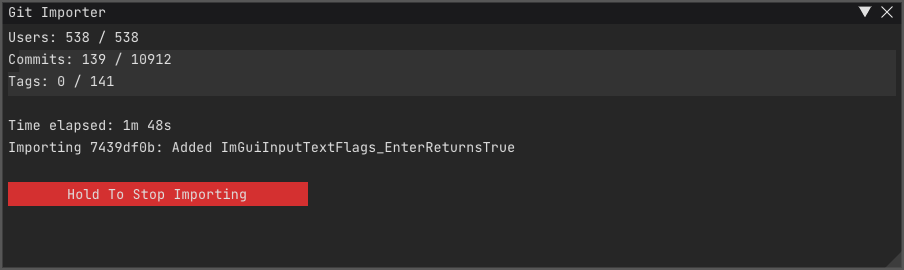
You'll be presented with a wizard that allows you to choose which branch to import. It will give you the option of importing users, commits and tags.
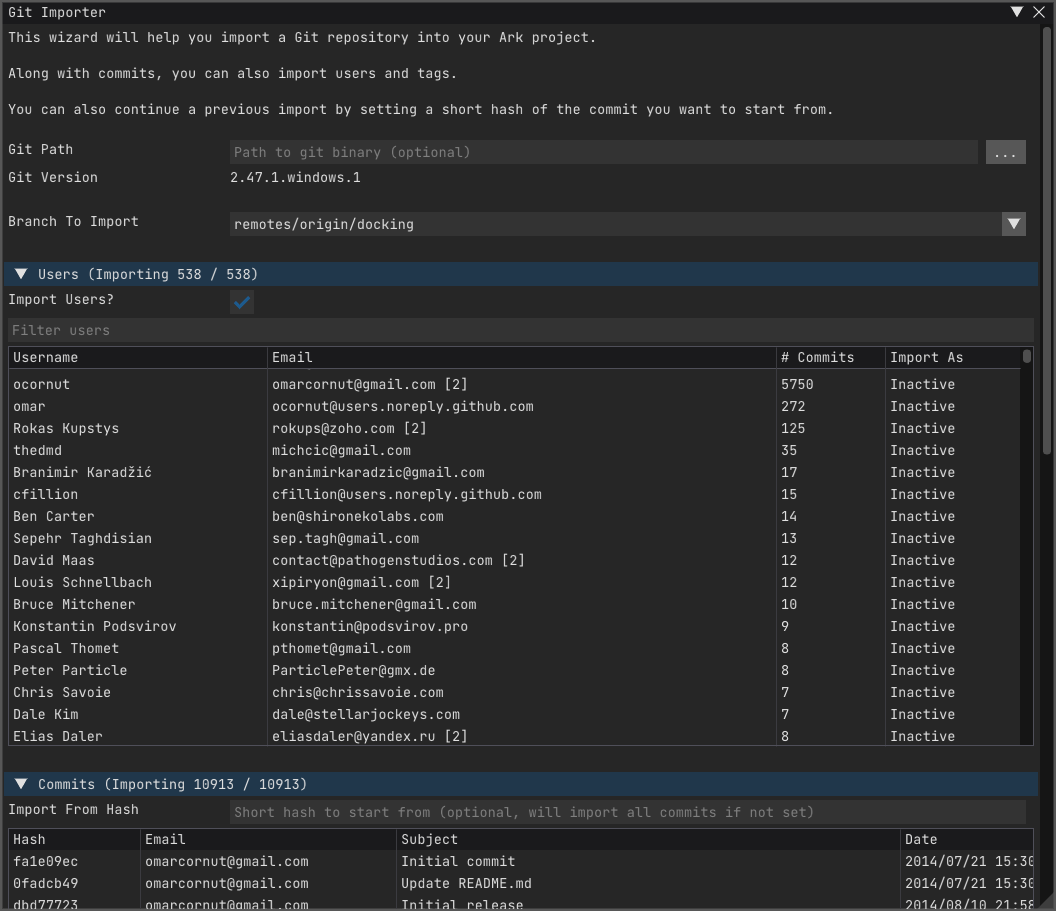
Besides presenting clearer information on the progress, it also allows you to stop the import process in the middle. Just remember to copy the short hash you stopped on in order to continue the next time.
There is currently no cli command to do imports from Git.
Convert Server <-> Built-In Server
To convert a server to a built-in server all you need to do is:
- Shutdown both your server and your GUI client
- Move the server folder inside your workspace folder and rename it to .ark_server/
- Run your GUI client
The GUI client will now automatically start / stop the server for you.
Conversely, the steps to turn your built-in server into a server simply:
- Shutdown your GUI client
- Move your .ark_server/ folder to wherever you want it (renaming it is advised, but not necessary)
- Run the server
- Run your GUI client
Changelist
A changelist is the base unit of work that a developer can create, like the name implies it is a list of changes (e.g. file A got added, file B got modified). It has 3 possible states:
- Workspace Changelist: exists only in the workspace;
- Shelved Changelist: a workspace changelist that has been uploaded to the server, but not yet committed;
- Committed Changelist: a shelved changelist that has been marked as being committed;
When you shelve your changelist, it gets assigned an id, and the data is copied to the server.
Once you decide to commit your shelf, the server simply changes the state of the changelist to committed, given that all the data is already on the server.
One of the benefits of having a centralized VCS is that you have a unique provider of ids for your changelists. Ark's changelist ids are incremental starting from 1, so the higher the id the later a changelist was committed.
This allows you to reason in a much more intuitive way about the state of your project, because if you're currently on changelist 1074 you know that you'll have any change committed in a changelist with a lower id.
Shelved Changelist
Quite often you end up in a situation where you need to collaborate with somebody, or you may simply want to store a snapshot of your current work in the server, while not disrupting anybody else's project. This is where shelves come in.
You may be familiar with them from Perforce, they are basically a way to store a changelist in the server without actually committing it.
Once a shelf is created, you can revert your local changes because you can always get them back from the shelf.
A shelf will now have a unique changelist id, and with this id other users can also unshelve your changes, allowing them to get changes without affecting anybody else.
However, Ark takes shelves to a new level. In Perforce, shelves are one way street, meaning that if user A shelves something, user B can only unshelve it, they cannot update or even commit this shelf.
Ark's shelves are two-way, it allows for any user to contribute to this shelf, and when there's changes users will get notified.
This makes them de-facto super lightweight branches, where people can collaborate on small tasks without going through all the hassle or creating, switching and merging branches.
Shelve / Unshelve
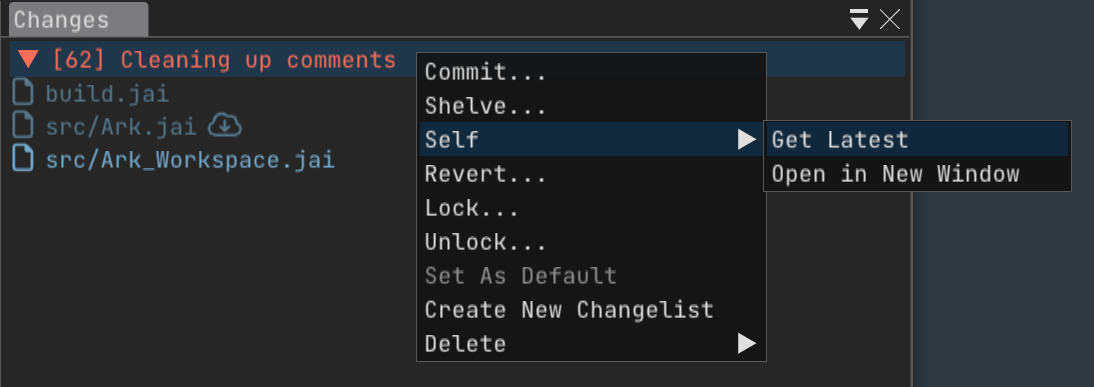
To create a shelf you right-click on any workspace changelist and select Shelve....
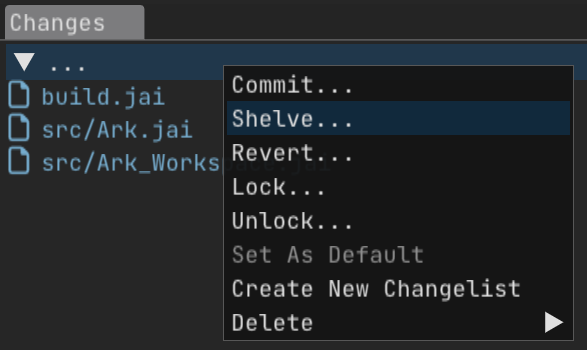
It will bring up a window like the commit window, in which you can add / edit your message and then shelve.

Once a workspace changelist is tied to a shelf, it will have a changelist id.
When your workspace changelist is tied to a shelf, it will give you the following visual feedback on your files:
- Normal color: there are differences between the local version and your current shelf revision;
- Faded color: there are no differences between the local version and your current shelf revision;
- in front of the name: there are differences between your current shelf revision and the latest shelf revision;
When there is a new revision of your shelf the comment will be displayed in orange, and you'll be able to get latest by right-clicking and choosing Shelf -> Get Latest.
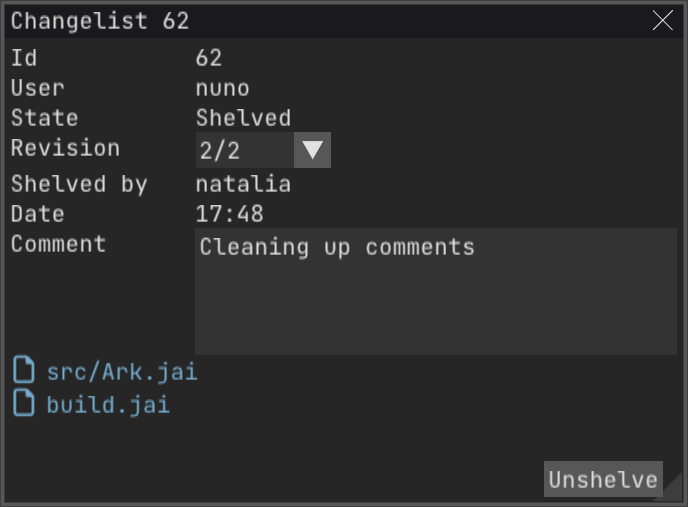
To unshelve, you first need to open the changelist's window by going to Workspace -> Go To... and passing it the shelf's changelist id.
You'll now get a changelist window, in which you can go through all the revisions of this shelf and unshelve any of them.
Remove File From Shelf
To remove files from a shelf you right-click on them and select Remove From Shelf. This will create a new shelf revision without those files.
Delete Shelf
There's currently no way to do this, you just have to revert changes and delete your workspace changelist, the shelf will continue to exist in the server.
Committed Changelist
Commit is the act of making a changelist officially part of the history of the branch it was committed to. This means that anybody on that branch getting latest will get those changes copied locally.
Commit
To commit a changelist you right-click on it's header and choose Commit.... It will open a new window in which you can change the commit message, and then commit the changelist.

You can also select only some files and right-click on them to commit them. This will create a new workspace changelist and move all the selected files to it.
To commit a changelist via cli you use the commit command.
And to see the content of each one of them you can run
History
When a changelist is committed it becomes now part of the history of the branch.
The history is basically a stack of committed changelists, with growing id.
The changelist at the top is called latest or head.
In Ark you can only be in one changelist at the time, your current changelist. This is by design, to prevent issues like you can have in other VCS like Perforce.
The reason for it is that if somebody tells you that they are on changelist 602 and they don't have any local changes - which Ark tracks automatically for you -, then you're guaranteed that if you switch to that same changelist you'll have the same content that the other user has.
This sounds like a basic thing, but if you ever worked with Perforce you most likely encountered a situation where somebody either has untracked local changes or has part of their code tree at one changelist and part at another, making it quite a frustrating endeavour to figure out what's wrong.
Current Changelist
The current changelist is displayed on the window title bar and also on the Views -> History panel, being the changelist with white outline around it.


To know what if your current changelist you can use the changes command, which also prints the local changes.
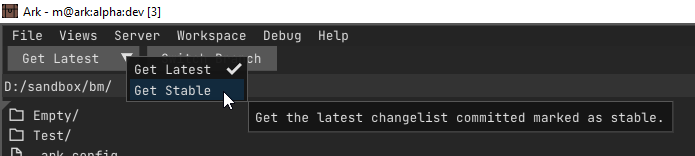
Get Changelist
To get latest, the easiest way is to just click the Get Latest button. However, you can also just right-click any changelist in Views -> History and choose Get Changelist.
If you're using Stable Flag feature, you can switch at the top between Get Latest and Get Stable
To get a changelist you use the get command.
To get latest / stable, you can pass -cl latest or -cl stable. There are also specific commands to get them:
Download Changes is currently not supported.
Tags
Tags are a way to mark committed changelists to be able to track more easily important changelists. For example, if you built a demo for an event you may tag it with 'demo_2025' tag and more easily go back to it.
Since we want to allow some commands to work on both changelist ids and tags, there's a few restrictions with what is considered a valid tag name:
- Cannot be reserved dynamic changelist id names (i.e. head, latest, stable, current)
- Cannot be a changelist id (e.g. 123, 3_344, 8.555)
- Cannot start with * (since it is used for pattern matching with changelist ids)
Add Tag
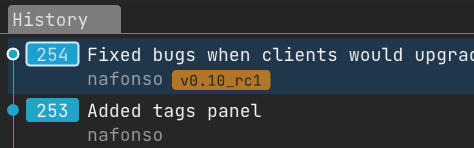
To add a tag to a committed changelist you right-click on it in the History panel and choose Add Tag.
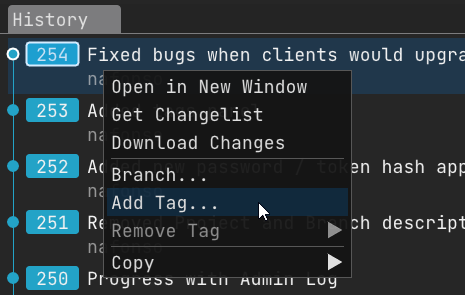
This will bring up a dialogue where you can input the tag name.
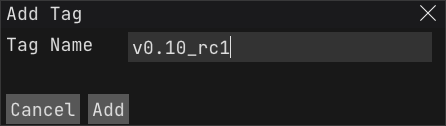
If the tag is already set on another changelist, you'll be able to move it to the new one.
Tags will be visible below the comment, next to the username.
To add a tag you use the tag-add command.
If you don't pass the project it will use your workspace's current project.
If the tag is already assigned to another changelist, it will only be moved if you pass -allow_move true.
Remove Tag
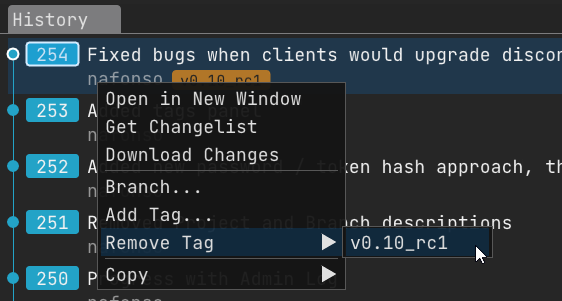
To remove a tag from a committed changelist you right-click on it in the History panel and choose Remove Tag and click on the one you want to remove.
To add a tag you use the tag-add command.
If you don't pass the project it will use your workspace's current project.
List Tags
To view all tags in a project you open Views -> Tags panel.
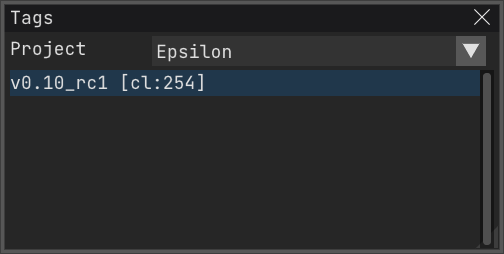
You can switch the project on the combo box at the top, and you can right-click and click Open Changelist In New Window to jump to that changelist.
To list tags you use the tag-list command.
If you don't pass the project it will use your workspace's current project.
If you pass a changelist id it will show only the tags of that changelist, otherwise it will show all the tags in that project.
Content Flags
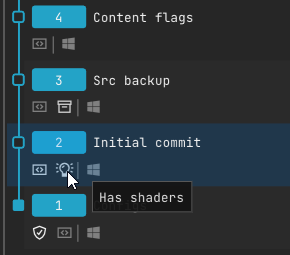
Content flags are a way to identify Changelists at a glance. Quite often you want to know if when you get a changelist the project will have to recompile, or if you're tracking down where did something change along the history.
Content flags are defined in a .ark_config file at the root of the workspace. Here's how their definition looks:
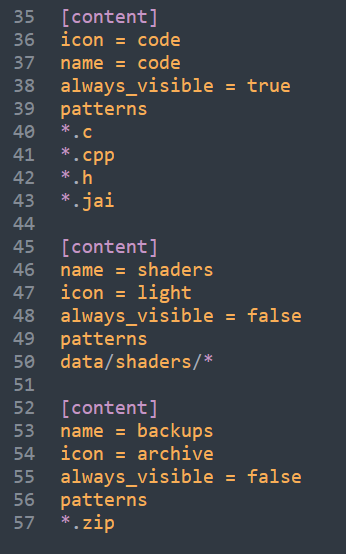
The patterns section follows the ignore / lock rules (including exclusion with !).
Stable Flag
When working on more complex projects it is quite useful to be able to know if a specific changelist is stable or not. Teams that have custom VCS integrations tend to add this functionality via their own tools, but we consider it to be important enough to be built-in the VCS.
By default each changelist has an Unknown status of their stable flag, and it can be set via the context menu of the changelist:
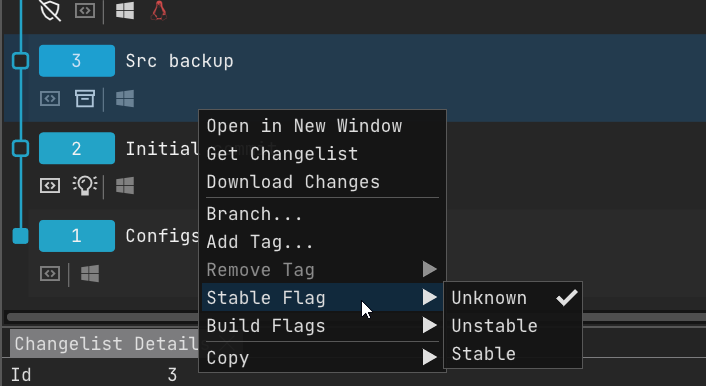
Get Latest button can then be changed to Get Stable and it will then get the latest stable changelist instead of the latest changelist.
However, to get the full power of the stable flag, you need to integrate it with the Build Flags and your build machine processes, allowing it to be handled automatically.
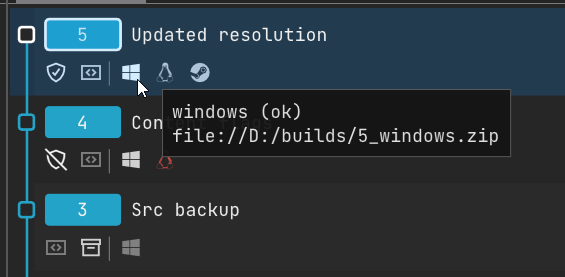
Build Flags
Quite often teams that can afford to do custom VCS integrations add their own tools that allow you to track states of builds. Like the Stable Flag we consider that this is an extremely important feature that should be built-in the VCS.
Build flags are defined per project. To define them go to Server -> Projects / Branches, select the project and enter Admin Mode:
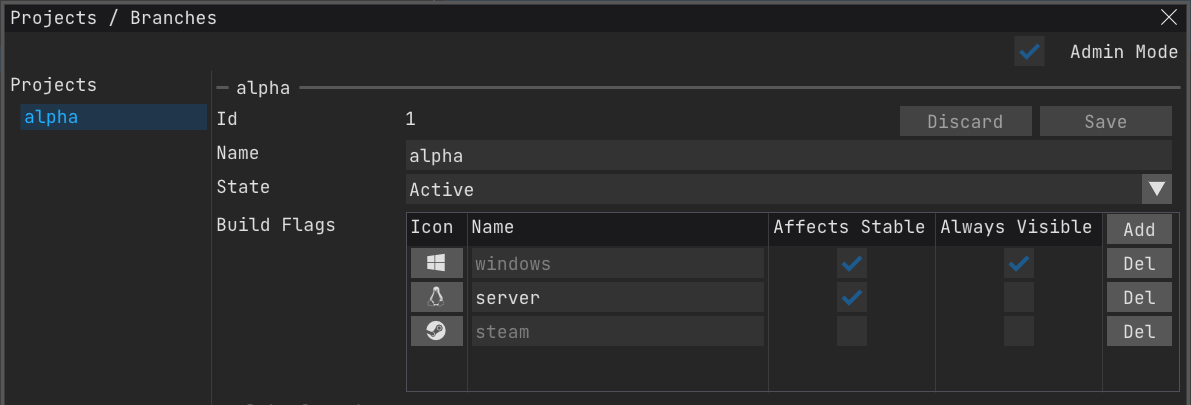
Build flags have 4 states: none, running, ok and fail. Whenever all the build flags marked as Affects Stable have their state set to ok that changelist will automatically be flagged as stable.
You can then set the status of each flag using the context menu in the changelist:
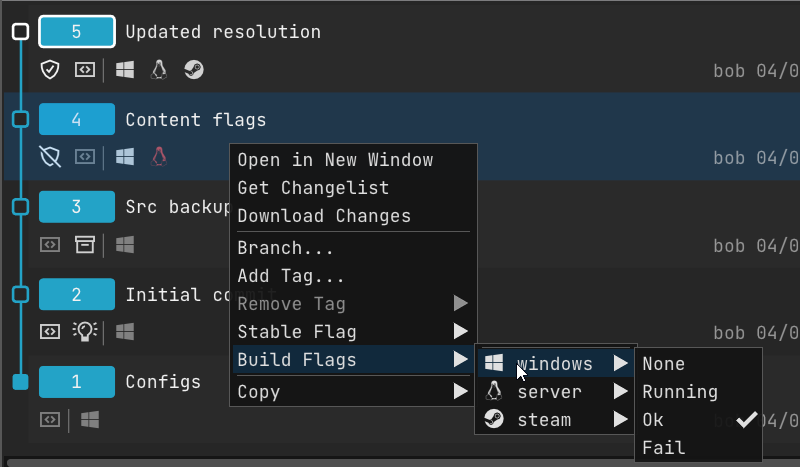
The real power of the build flags comes from integration into your build system. You can setup server hooks that will trigger some process in your build system. The build system process can then communicate call Ark commands to set the build flags.
This also means that the Bot User is specifically useful for working with build machines / flags.
To print the state of a build flag you can use the get-build-flag command:
The data parameter of the cli command allows you to set custom data that will then be shown in the tooltip of that build flag:
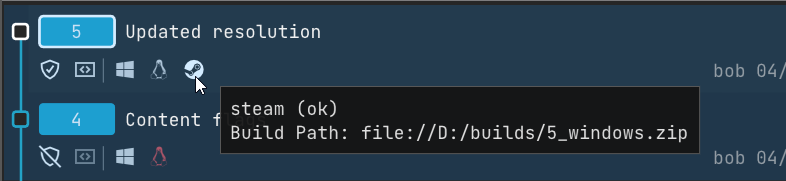
If you click the build flag you can copy its data or open any of the links. Ark will identify anything that starts with file://, http:// and https:// as a link and will open then in the explorer or browser.
Ignore Files
All projects have files that we don't want to commit, and Ark follows a similar path to Perforce and Git.
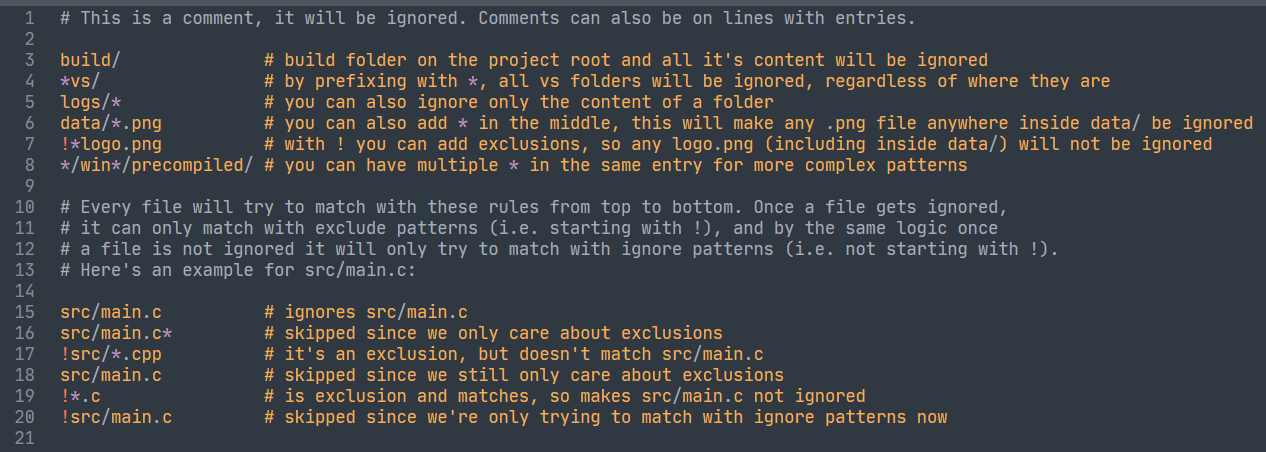
There's an .ark_ignore file in which you define rules to ignore or not files / folders.
By default and for convenience, when connecting to an empty project Ark will add a default .ark_ignore with common rules, but you can always go in and edit these rules (specially removing rules that are not needed, given that the less rules the faster it will be).
Given Ark's approach towards performance, we keep the ignore rule system simple by not supporting regex. Here's what you need to know about it:
- It can only have 1 entry per line;
- It is case insensitive;
- # starts a comment;
- * is used to create complex patterns;
- ! allows to exclude patterns;
Here are some examples of all of this put together:
Ignore Inspector
Whenever projects get too big, ignores can get a bit out of hand, and some times it's quite annoying to find out why something is or is not ignored. To help with this Ark comes with the panel Views -> Ignore Inspector.
When you click Gather Ignore Data it will reconcile the whole project and collect information about the ignores. You can then hover each entry to find out why it was added or removed from the ignores.

Smart File Locking
When working with multiple users on binary files, it's very important to be able to control who has currently ownership of the files in order to prevent losing work. This concept is generally know as file locking.
Ark's approach tries to improve the standard provided by other VCS.
Instead of locks being exclusive to one user, Ark uses a lock queue approach, in which the user at the head of the queue has ownership but others can queue behind them to get the lock as soon as it's released.
It also allows you to request / give the lock ownership to another user in the queue.
To configure which files should lock by default, you edit the .ark_lock file. In it you define rules - following the same pattern rules of the .ark_ignore file - of files that you want to be automatically locked when edited.
You can also explicitly lock a file, even if it is not matching any of the .ark_lock file rules.
Lock / Unlock File
To explicitly lock a file, you right-click on it and choose Lock. If there was nobody locking the file, you'll become the lock owner. If there was already locks on the file, you'll get added to the back of the queue for that file.

If anybody is locking a file, you'll see an icon in front of it. Here's what each one represents:
- You have lock ownership;
- Somebody else has lock ownership, you haven't tried to lock it yet;
- Somebody else has lock ownership, you have requested the lock and are in the queue waiting for it;

To unlock the file you right-click on it and choose Unlock.
To lock (or give the lock to a user) use the lock command.
If nobody owns the lock, you'll get lock ownership. If somebody else has ownership you'll get added to the lock queue.
To forcefully take / give from its current owner you'll need to use the -force true (requires Manager or Admin permission).
To unlock files use the unlock command.
To remove locks from other users you'll need to pass -force true (requires Manager or Admin permission).
If -force true is passed without any file paths, all locks will be removed.
Request Lock
Some times users will have by default a file locked because they edited it, but quite often they don't really need it. To help with this process, there's a mechanism to request the lock ownership from the current owner.
To do so, right-click on a file you already locked and choose Request Lock Ownership.

If the lock owner is online, they'll receive a notification requesting approval. After they make a decision, the requester will get a notification informing them of the decision.


Take / Give Lock
Some times users may have kept files locked and not be available to give them, and for those cases you have the option to take / give the lock to somebody else. It requires Manager or Admin permissions.
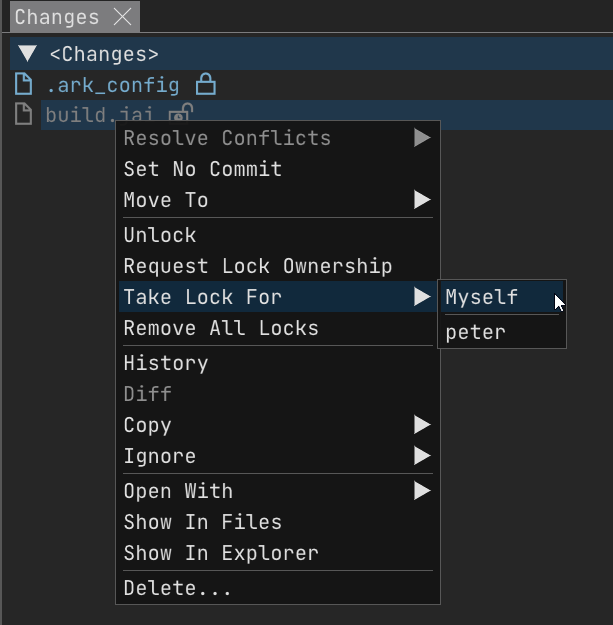
There's also an option to remove all locks (i.e. current owner and lock queue).
Cli command to take / give lock is the same lock command, just with specific arguments. To remove all locks, it's the unlock command.
List Locks
In some cases it's extremely useful to know about all the locks, since if you're not working on those files they'll be hidden in your file hierarchy. For those cases there's the Views -> Locks window.
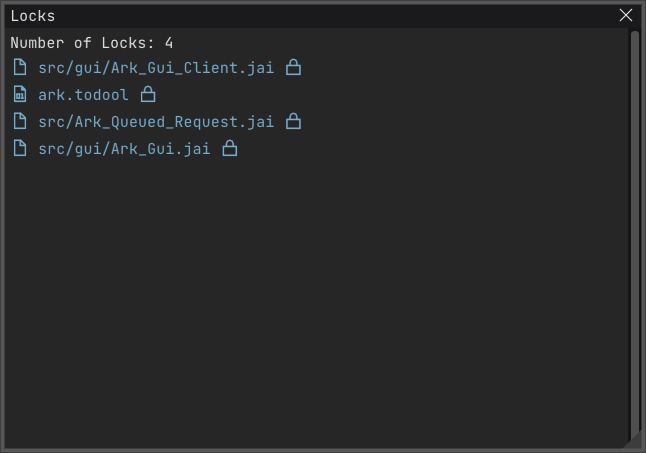
To list all the locks you can use the lock-list command.
If no user is passed, it will print the locks of every user.
Users
Like mentioned above, the first user connecting to the server will become an Admin. Afterwards, all other users will need to be manually added.
A user can have one of the following roles:
- Normal: use version control;
- Manager: use version control, manage normal/manager users;
- Admin: use version cotnrol, manage all users, manage projects;
Keep in mind that even though we login using email, the actual user is identified by a unique user id (starting from 1). This means that a user is free to change their email / username and it will display the updated version even on older changelists.
That being said, the email and username need to be unique between users.
Add User
To add a user, go to Server -> Users and choose Add User.

To add a user use the user-addcommand.
Edit User
To edit a user, go to Server -> Users and select the user you want to edit.

To edit a user use the user-edit command.
To see a list of all the users use the user-list command.
Bot User
Users require you to add a password and login with it, but there's some cases - like for example build machines - where you want to be able to initialize workspaces.
So specifically for this use case, there's a special user that is created by default called bot. This user instead of password uses a token. If you to Server -> Users and select the bot user you'll have options to copy the token and invalidate it.
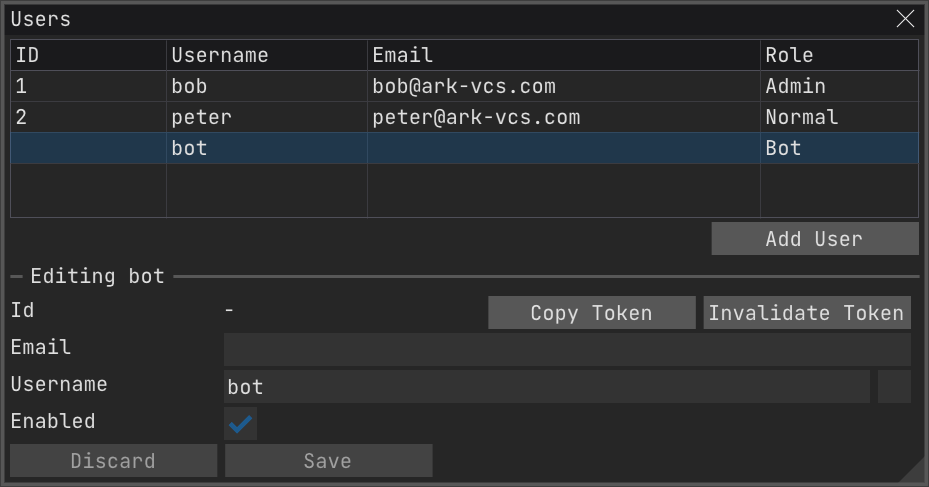
To initialize a workspace for the bot user, there is a special init-bot command. A workspace setup for the bot user cannot be opened with gui, only with cli commands.
Here's an example of a token:
A bot has permissions in-between Normal and Manager, so it can get, commit, take locks, but it cannot add or edit users.
Projects
A project can be seen as a depot in Perforce or repository in Git. Projects are self contained, they have their our assets, branches, changelists, and history. Usually what you'll want to do is to setup a project for each individual game/application/website you want to develop.
When creating a new server, it will automatically create a project for you with a random name from [Alpha, Beta, Gamma, Delta, Epsilon, Kappa, Lambda, Sigma, Omega] and a root branch called dev.
Like everything else, projects are identified by a unique id (starting from 1), so you can change its name freely. This implies that project names cannot be numbers.
Add / Edit Project
To view the projects of the server this workspace is connected to, open Server -> Projects / Branches. By default it will show your current project and a list of its branches.

To add a new project, you need to select Admin Mode, which will allow you to now add new projects / edit existing ones.

To list the projects you have the project-list command.
Branches
If you're familiar with Git then you'll be familiar with how branches work in Ark.
Branches allow you to split your current code base into multiple versions, like for example to stabilize a build for a demo or release.
We highly recommend you to follow a trunk-based approach to development, which means that people work as much as possible on the same branch (traditionally called trunk, hence the name trunk-based development) and only jump to other branches when necessary.
With this approach, branches are usually done for stabilizing or for very disruptive development (e.g. you want to replace the physics engine).
Working in this way has a lot of benefits:
- Everybody has the same code / assets;
- All code / assets are getting QA;
- Disruptions to your code / assets from others is detected very fast, and vice-versa;
- Features can be turned on / off simply by changing a flag;
All of these combine to create a much more stable project. If a lot of branches are used (and the longer they live the worse), then things tend to get much more unstable when merged. Don't just trust us, Jason Gregory from Naughty Dog at HandMadeCon 2016 goes over this subject.
That being said, Ark still allows a workflow that is branch-driven, and we try to make our branching and merging process as simple and fast as possible.
Add Branch
To add a branch right-click on the changelist you want to branch from and choose Branch....

Please note that like with the projects, branches are identified by a unique id, however we still require unique branch names since in cli commands we allow to reference branches by both id and name.

When creating the branch you have the option of just creating it or to create and switch. If using Branch and Switch the workspace's current branch will now be the newly created branches.
To add a branch use the branch-add command.
Edit Branch
To edit a branch you open Server -> Projects / Branches, check Admin Mode and choose the project and branch you want to edit.

To list the branches of a project you have the branch-list command.
Switch Branch
You can switch branches by using Switch Branch button or right-clicking any committed changelist from that branch and choosing a Switch To <branch>. Keep in mind that almost always you want to switch to the latest committed changelist for that branch!

There's 4 options you can choose when switching:
- Latest: go to the head changelist of this branch, any local changes are reverted;
- Changelist <id>: go to the the specific selected changelist of this branch, any local changes are reverted;
- Changelist <id> (Common Root): go to the latest common root between these 2 branches (i.e. where the branch lines intersect from merges), any local changes are dropped;
- Changelist <id> (Common Root, Keep Local Changest): go to the latest common root between these 2 branches (i.e. where the branch lines intersect from merges), keep our local changes;
To switch branch you have the switch-branch command.
Merge Branch
Merging branches is always done to the branch you are currently on, so the first thing you need to do is to make sure you're in the branch you want to merge to.
After you're on the proper branch, you need to right-click the committed changelist from the other branch that you want to merge and choose one of the merge options.

All Up To <cl_id> will merge the whole branch up to that changelist, which is what you usually want. However, there are some use cases where you want to just get that specific changelist (e.g. a specific bugfix), so for those cases you choose the Cherry Pick Only <cl_id> option.
Ark will figure out what needs to be merged. If there are no conflicts with that file it will be copied to your workspace and appear in the workspace changelist as merged.

If there are conflicts, the local files will be left alone but flagged as having conflicts that need to be resolved.

Once all conflicts are resolved, you can now commit your workspace changelist with the merge. The history panel will reflect that this changelist has been merged.

Diff
You can see a diff of text files directly inside Ark via Views -> Diff.

It not only allows you to at a glance check your changes, but also revert chunks with a simple click. You can customize which end of line is displayed and the ammount of padding around changes.
However, when doing big diffs or merges it is quite often better to just use an external tool. You can configure your extern diff tool in File -> Preferences.
To diff you can right-click on selected file and choose which version to diff with. There's also a Ctrl+D shortcut to diff with previous revision of a file (or latest if you have changes).
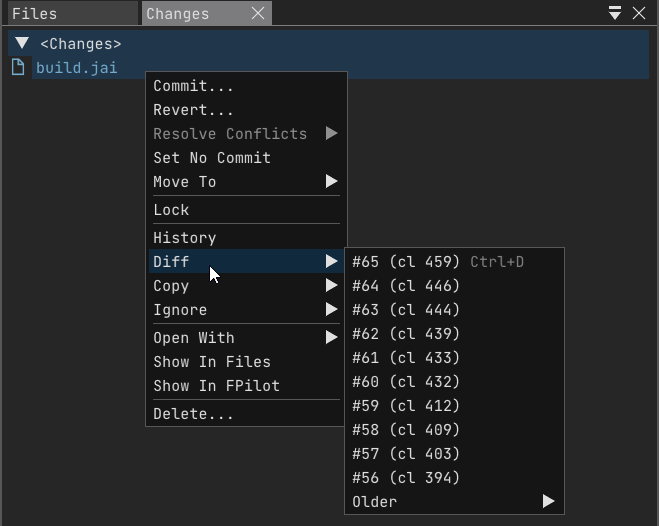
To diff you have the diff command.
If no rev and no cl parameters are passed, it will diff with local with previous revision. -rev and -cl can be intertwined.
If a specific revision number is passed, it will compare with that revision. To use delta you need prefix with + or - (e.g. +3), other_rev will be relative to rev.
Conflicts
Conflicts can happen in 2 situations: when getting latest and when merging changes.
When getting latest is the most common occurrence, it's when the files you're working on had changes committed in the meantime.
Likewise with merging branches, if the assets have been changed in both branches they will be flagged as being in conflict and you'll have to resolve them.
There's 3 options to resolve a conflict:
- Keep Ours: leaves your current workspace file intact;
- Get Theirs: discards your current workspace file and copies the remote version;
- Manually: launches the defined merge application for a manual file merge;
Resolve Conflicts
To resolve conflicts, you right-click on the files or workspace changelist and choose one of the Resolve Conflict options.

After it is resolved the conflict icon will change to reflect that.
You can also choose Open Window, which will open a specific conflict resolution window for bulk resolving.

To resolve conflicts you have the conflict-list, conflict-resolve and conflict-reset commands.
If file paths are passed, the list will be filtered to only contain those.
If file paths are not passed, all conflicts will be resolved. If a conflict is already resolved in some way, you need to pass -allow_resolved true.
If file paths are not passed, all conflicts will be reset to needs resolving.
No Commit / #nocommit
When working on a file, you'll quite often find yourself in a situation where you have local changes that you don't want to commit accidentally. To help with this situation there is a feature called #nocommit.
There are two ways to use #nocommit. The first - and more convenient if you're programmming - is to simply add #nocommit keyword inside your text files. When parsing text files for changes, Ark will look for this keyword and flag your file. To remove this state, you simply remove this keyword from your file.

The second way is to explicitly mark the file by right-clicking on it and selecting Set No Commit, which is specifically useful for binary assets.

When using the explicit approach, you'll then have to use right-click Clear No Commit option to remove it.
Keep in mind that a text file can have both in file and explicit #nocommit, and you can see that state in the file's tooltip.
In case you have a lot of files that you want to prevent committing - perhaps part of a bigger feature -, you can also mark the workspace changelist with #nocommit by right-clicking on it and selecting Set No Commit. In the case of workspace changelists, it will always just append #nocommit to its comment, which means that you can also just write it yourself in the comment. To remove it, you can either manually remove it from the comment or right-click and select Clear No Commit.

The print command allows you to print out information about changelists, users and assets.
Crash Dumps
When Ark crashes, it will generate a crashdump that the user can then submit a bug report with. They are saved along side that session's log in:
- <server folder>/crashdumps/ for servers;
- C:/Users/{user}/AppData/Local/Ark-Vcs/crashdumps/ for clients in Windows;
- ~/Ark-Vcs/ for clients in Linux and MacOS;
Game Engine Plugins
Ark is a standalone application, but there are some cases where having a plugin is helpful, because it allows for a tighter integration, like being able to see in the game editor that an asset is outdated or locked by somebody else.
It is also necessary when using editors that are not very VCS friendly, like it is the case of Unreal Engine (UE). Unfortunately, when UE loads an asset it keeps a hold of that asset, which makes it impossible for Ark to then make changes to it. By having a plugin, you can have a communication channel between Ark and the game editor to address these issues.
Unreal Engine Plugin
Install
To install the plugin simply place the ArkSourceControl folder either in the Engine (e.g. <path_to_engine>/Plugins/Developer/) or in the Game (e.g. <path_to_game>/Plugins/).
After relaunching your UE Editor, go to Edit -> Plugins and enable Ark Source Control plugin.

Setup Unreal Editor
To start using Ark as you version control system in Unreal Editor go to the lower right and select Revision Control -> Connect to Revision Control...:

Then choose the Ark Vcs as the provider, and configure all the settings:

The Ark workspace will default to your project's root, however you may want to change it if for example you are using Unreal Engine Source.
After you click Accept Settings and Unreal Editor will launch Ark for you. If you close Ark, then you'll be disconnected from source control. To reconnect just open this window and click Accept Settings again. When you're connected to version control it will display a green checkmark on Revision Control button:

Afterwards you simply use version control like you would inside Unreal Editor.
Lock Requests
If you're used to Ark, you'll know about how our locks work, and some mechanisms that it has like being able to request lock ownership from another user.
These mechanisms will also work from inside Unreal Editor. If you try to lock (i.e. checkout in Unreal Editor nomenclature) a file that is already locked by somebody else, you'll be presented with a notification asking if you'd like to request the lock ownership:

If you receive a request, you'll also get a notification asking if you want to give the lock away:

You'll also receive notifications with the response to a lock ownership request, and when you eventually receive it.
File Status Icons
One of the benefits of using the plugin is that you'll be able to get visual feedback on your assets:

Here's a listing of all the icons Ark uses:
 Local changes and is new
 Local changes with lock
 Local changes with lock by another user
 Local changes with asset outdated
 Local changes with conflict which needs to be resolved
 No local changes with asset outdated
 No local changes with lock ownership
 No local changes with lock by another user
You don't need to memorise these, when you see an icon on an asset just hover it and you'll get all the information on the tooltip.
